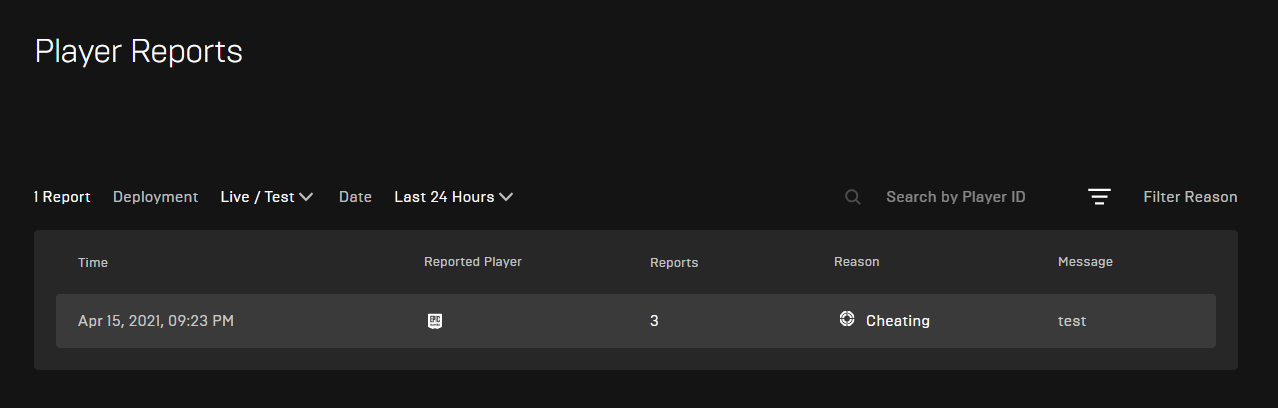
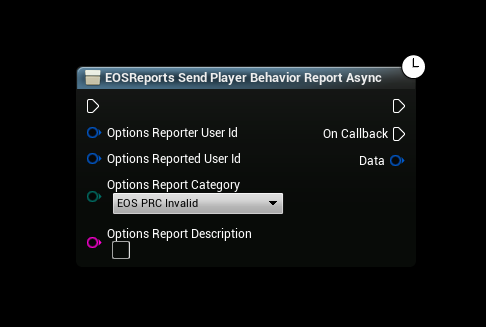
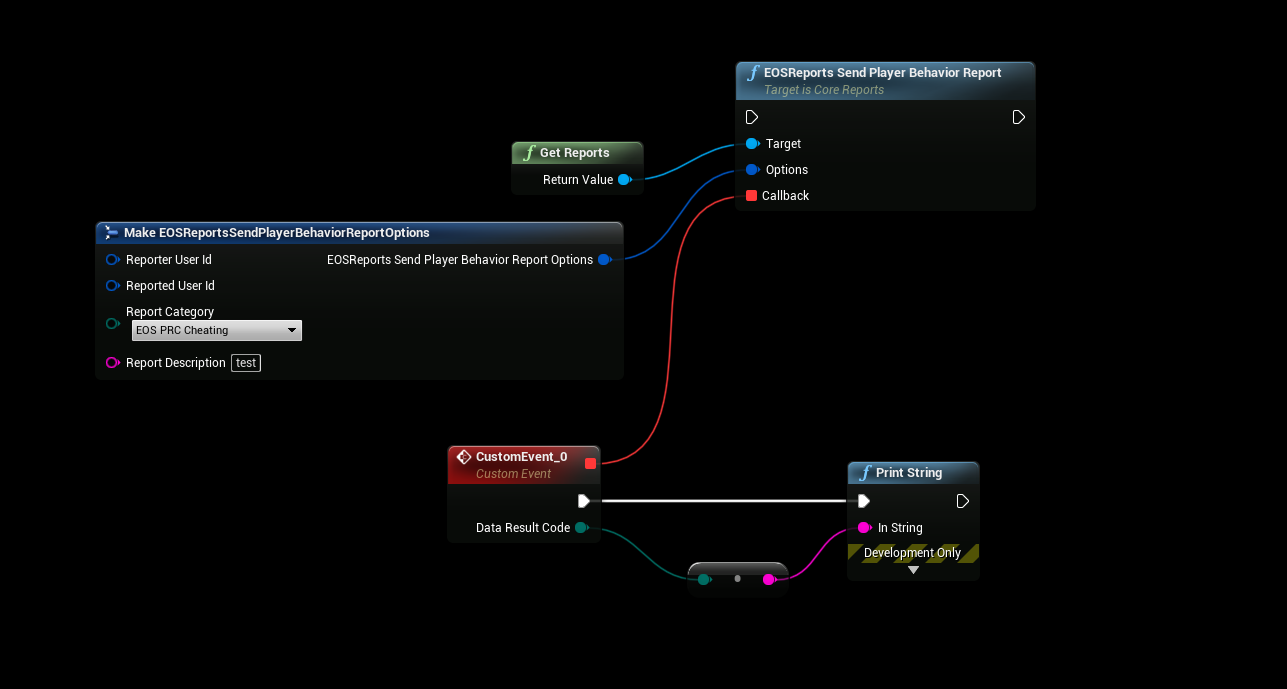
The Reports Interface stores in-game user behavior reports. You can query these user reports from your Developer Portal to view the details of reported user behaviors, for example, cheating, verbal abuse, offensive profiles, and so on. This interface provides information that you can then use with the Sanctions interface to conduct any punitive actions.
This Interface has now been implemented and is available with EOSCore
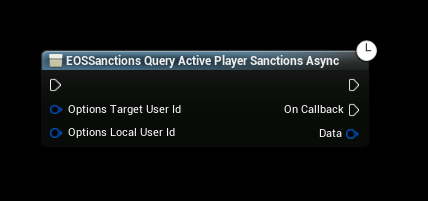
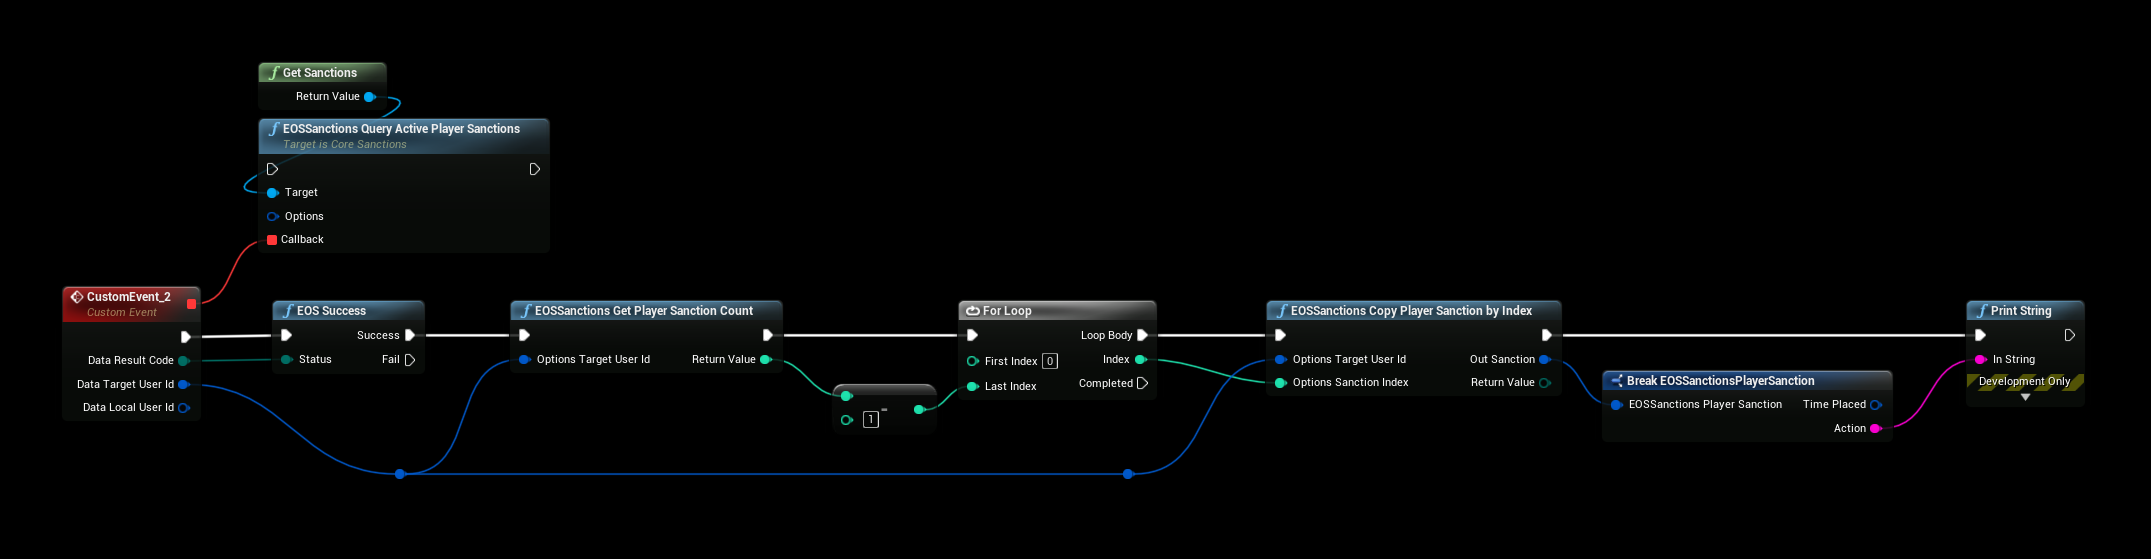
The Sanctions Interface manages punitive actions taken against your users. Actions may include temporary or permanent bans from gameplay or communication bans that limit the social aspects of your product for a particular user. You define the disciplinary actions for your product to handle negative behavior based on your use cases.
This Interface has now been implemented and is available with EOSCore
This release introduces two new complementary EOS services related to in-game moderation: Reports and Sanctions. The Reports service allows collecting and managing player behavior reports for reasons like cheating or abusive in-game communications. The Sanctions service allows attaching penalty information to accounts.
Reports and Sanctions
New: Added Reports service for managing in-game user behavior reports.
New: Added Sanctions service for managing punitive account actions.
C# improvements (samples/code)
C# SDK
New: Now includes libraries for IOS and Android.
New: The SDK features APIs specific to specific platforms, and these are now available in the C# SDK. For example, there is now an Android specific overload of Epic.OnlineServices.Platform.PlatformInterface.Initialize available, using Epic.OnlineServices.Platform.AndroidInitializeOptions.
New: There are now additional versions of the C# SDK available for restricted platforms, such as Xbox One, Switch, and PS4. Ask your technical account manager for more information and availability.
Epic.OnlineServices.Auth.AuthScopeFlags and Epic.OnlineServices.Auth.LinkAccountFlags are now declared as int instead of ulong.
Epic.OnlineServices.Connect.ExternalCredentialType was moved to Epic.OnlineServices.ExternalCredentialType.
Custom memory delegates no longer use an intermediary C# delegate due to performance issues. The recommended practice is to have your native library return function pointers for each memory function, and pass these pointers into Epic.OnlineServices.Platform.InitializeOptions directly. For more information, see the “Custom memory delegates” section of the “Using the C# SDK instead of the C SDK” documentation.
Mobile improvements (samples/code)
Android
Platform specific AndroidInitializeOptions is now only used for setting directories and is optional. Uses JNI_OnLoad to get JavaVM
Bug Fix: Exclude keychain related information from Auto Backup
EOSSDK is tested with Android emulator version 30.0.0, which allows running ARM binary on x86 images
General Fixes
Achievements
Added LocalUserId to EOS_Achievements_QueryPlayerAchievements. This allows a client to retrieve a different user’s achievements (if backend client policy allows it). Also renamed UserId to LocalUserId.
Added LocalUserId for EOS_Achievements_CopyPlayerAchievementByIndex and EOS_Achievements_CopyPlayerAchievementByAchievementId options so we can also check the local user’s achievements when retrieving data for a non-local user. When querying for player achievement data with a non-local user, the player achievement data will only have the unlocked DisplayName, Description and IconURL when the local user has also unlocked the achievement.
Bug Fix: Referencing an invalid achievement on the backend service will now return EOS_NotFound.
Authentication
Bug Fix: Invalid credentials now generate the correct error result codes.
Bug Fix: Fixed Scopes permissions after Auth is refreshed.
Connect
EOS_EExternalCredentialType was moved from eos_connect_types.h to eos_common.h.
Added Google as supported user authentication provider.
Core
Added new error mappings based on client permissions service. These errors will be returned if a service is used that doesn’t have permissions setup properly to execute the call. The error log from the backend service will provide extra details, and the sdk will provide the following error mappings.
EOS_NotConfigured: backend hasn’t been configured for this service
EOS_AccessDenied: A client policy action is setup but the call fails a check (e.g. can only access local user files)
EOS_InvalidAuth: This call is configured to require a signed in user
EOS_Platform_SetOverrideLocalCode now allows null to be used to clear the override.
Bug Fix: Turned on curl seek callback. Will retry http connection failures in some instances where a reused connection just failed.
Updated comments for EOS_EpicAccountId_FromString and EOS_ProductUserId_FromString to improve clarity of their usage.
The EOS_ReallocateMemoryFunc memory callback will no longer request reallocations of size 0. This resolves a crash issue when 0-size allocations were returned to the SDK.
Lobbies
New: Both lobbies and session SendInvite functions will send the invite to the Epic Games Launcher if the user is logged in there. This will allow the user to launch the game and join their friend directly. At launch, the Session|LobbyInviteAccepted callback will fire once the invite has been processed. The application will need to use the details to join the given invite. This requires some setup on the dev portal to associate the application with a deployment id. See the dev portal and documentation for details.
Lobby owner can set bAllowInvites at lobby creation to control the ability to send invites. Added new function EOS_LobbyModification_SetInvitesAllowed so invites can be selectively enabled/disabled by the lobby owner. EOS_Lobby_SendInvite will enforce this setting.
Added the ability to set a lobby bucket id, similar to sessions interface:
This value is considered the primary search partition
It can be set at creation time via EOS_Lobby_CreateLobbyOptions
EOS_LobbyModification_SetBucketId can be used to modify the bucket during lobby lifetime
The current value can be found inside EOS_LobbyDetails_Info
Bug Fix: Added “search by target userid” for users other than local player. Previously this was only working for users searching for themselves. As long as the lobby permission is greater than invite only, then players actually registered in the lobby should be searchable.
P2P
New: Added the ability to control and query the size of the P2P Packet Queues. Clients can now set the (approximate) maximum amount of to use to store P2P packet data, as well as query the current used memory and count of P2P packets. The default maximum packet size for the incoming and outgoing packet queues are 10 MiB each. (Note: this memory is allocated as needed and is not always in use)
New: Added a new handler EOS_P2P_AddNotifyIncomingPacketQueueFull for an Incoming Packet Queue Full event, which is triggered when incoming data would otherwise be dropped due to a full packet queue. This event gives applications an opportunity to read data from the queue or increase the size of the queue, so that new incoming data is not lost.
Player Data Storage
When transfer is cancelled twice it returns AlreadyPending instead of Success the second time now.
Player Data Storage and Title Storage components do not initialize in case encryption key is not present.
EOS_PlayerDataStorage_FileMetadata now includes aLastModifiedTime metadata
Bug Fix: Fixed potential crash during client shutdown related to not waiting for “Clear Invalid Cache” thread that can still be running at a time.
Bug Fix: PDS/TS: fixed a bug with incorrect error returned while trying to decrypt an empty file.
Bug Fix: Player Data Storage: Fixed a bug with incorrect error code in case user data callback sends Fail code.
Samples
Added “make install” support to Makefiles to add dependencies to Mac .app bundles.
Added “PRINTAUTH” console command to print current auth token details.
Added support for overriding asset directory location via “assetdir” command line param.
Added support for querying another player’s achievements using the “GETPLAYER” console command.
Added missing setting of email scopes permission from “scopesemail” commandline option.
Bug Fix: Samples build fix for Mac when using 3rd party libraries from Homebrew. Added a workaround to our cmake scripts to handle a situation when FindGLEW.cmake script fails to set variables properly.
Bug Fix: Fixed crash when entering non-digit characters in console when using “ingest” command.
Bug Fix: Fixed loading of assets via sample when launched from Epic Launcher on Mac. Asset directory (for loading fonts and textures) is now relative to executable’s directory.
Added support for using spaces in Commandline parsing (by enclosing inside “” – e.g. -assetdir “../My Folder/Data/”).
Session Based Matchmaking
Bug Fix: Sessions and Lobbies serialization has been fixed to properly handle integers larger than double precision. This should mean that 64 bit values can be properly sent and received within the SDK.
Social Overlay
Bug Fix: Unlocking a hidden achievement will now automatically query the player achievements to allow for proper notification in the Social Overlay.
Bug Fix: Resolved a bug where deleting a friend from the Epic Games Launcher while a game with the Social Overlay is running and the same account is logged in on the game would not remove it from the Social Overlay.
Stats
Added validation of TargetUserId for EOS_Stats_QueryStats and EOS_Stats_IngestStat.
DEPRECATIONS
Authentication
Deprecated EOS_LCT_DeviceCode in favor of EOS_LCT_ExternalAuth. It is recommended to use the readily available platform authentication for automatically login to the local user’s Epic account. If the user does not have a linked Epic account, the game can take the user to off-device PIN grant login flow using EOS_Auth_LinkAccount API and passing a EOS_ContinuanceToken returned by previous call to EOS_Auth_Login.